PocketBun Introduction
Quick links:
- Introduction
- How to use PocketBun
- Collections
- API rules and filters
- Authentication
- Files upload and handling
- Working with relations
- Extending PocketBun
Introduction
Please keep in mind that PocketBun is still under active development and full backward compatibility is not guaranteed before reaching v1.0.0. PocketBun is NOT recommended for production critical applications yet, unless you are fine with reading the changelog and applying some manual migration steps from time to time.
PocketBun is an open source backend consisting of embedded database (SQLite) with realtime subscriptions, builtin auth management, convenient dashboard UI and simple REST-ish API. It can be used as a standalone application and can be extended with JavaScript.
The easiest way to get started is to install PocketBun with Bun package manager:
bun add pocketbunto add it to an existing project.bun create pocketbun my-appto start a new project template.
After installation, you can start the application by running pocketbun serve.
And that’s it! The first time it will generate an installer link that should be automatically opened in the browser to set up your first superuser account (you can also create the first superuser manually via pocketbun superuser create EMAIL PASS) .
The started web server has the following default routes:
http://127.0.0.1:8090- ifpb_publicdirectory exists, serves the static content from it (html, css, images, etc.)http://127.0.0.1:8090/_/- superusers dashboardhttp://127.0.0.1:8090/api/- REST-ish API
By default, PocketBun will create and manage 2 new directories in the current working directory:
pb_data- stores your application data, uploaded files, etc. (usually should be added in.gitignore).pb_migrations- contains JS migration files with your collection changes (can be safely committed in your repository).
You can even write custom migration scripts. For more info check the JS migrations docs.
You could find all available commands and their options by running pocketbun --help or pocketbun [command] --help
How to use PocketBun
The easiest way to use PocketBun is by interacting with its Web APIs directly from the client-side (e.g. mobile app or browser SPA).
It was designed with this exact use case in mind and it is also the reason why there are general purpose JSON APIs for listing, pagination, sorting, filtering, etc.
The access and filter controls for your data are usually done through the collection API rules .
For the cases when you need more specialized handling (sending emails, intercepting the default actions, creating new routes, etc.) you can extend PocketBun with JavaScript .
For interacting with the Web APIs you can make use of the official SDK clients:
- JavaScript SDK
(Browser, Node.js, React Native)
When used on the client-side, it is safe to have a single/global SDK instance for the entire lifecycle of your application.
Web apps recommendation
Not everyone will agree with this, but if you are building a web app with PocketBun I recommend developing the frontend as a traditional client-side SPA and for the cases where additional server-side handling is needed (e.g. for payment webhooks, extra data server validations, etc.) you could try to:
- Use PocketBun as JavaScript framework to create new routes or intercept existing.
-
Create one-off Node.js/Bun/Deno/etc. server-side actions that will interact with PocketBun only as superuser and as pure data store (similar to traditional database interactions but over HTTP). In this case it is safe to have a global superuser client such as:
// src/superuser.js
import PocketBase from "pocketbase"

const superuserClient = new PocketBase('https://example.com');

// disable autocancellation so that we can handle async requests from multiple users
superuserClient.autoCancellation(false);

// option 1: authenticate as superuser using email/password (could be filled with ENV params)
await superuserClient.collection('_superusers').authWithPassword(SUPERUSER_EMAIL, SUPERUSER_PASS, {
  // This will trigger auto refresh or auto reauthentication in case
  // the token has expired or is going to expire in the next 30 minutes.
  autoRefreshThreshold: 30 * 60
})

// option 2: OR authenticate as superuser via long-lived "API key"
// (see #api-keys)
superuserClient.authStore.save('YOUR_GENERATED_SUPERUSER_TOKEN')

export default superuserClient;
Then you can directly import the file in your server-side actions and use the client as usual:
import superuserClient from './src/superuser.js'

async function serverAction(req, resp) {
  ... do some extra data validations or handling ...

  // send a create request as superuser
  await superuserClient.collection('example').create({ ... })
}
Why not JS SSR
Using PocketBun with meta framework such as SvelteKit, Nuxt, Next.js, etc. in a JS SSR mode is possible but it comes with many complications and you need to carefully evaluate whether the cost of having another backend (PocketBun) alongside your existing one (the Node.js server) is worth it.
You can read more about the potential problems in JS SSR - issues and recommendations #5313 but some of the common pitfalls are:
- Security issues caused by incorrectly initialized and shared JS SDK instance in a long-running server-side context.
- OAuth2 integration difficulties related to the server-side only OAuth2 flow (or its mixed “all-in-one” client-side handling and sharing a cookie with the server-side).
- Proxying realtime connections and essentially duplicating the same thing PocketBun already does.
- Performance bottlenecks caused by the default single-threaded Node.js process and the excessive resources utilization due to the server-side rendering and heavy back-and-forth requests communication between the different layers (client Node.js PocketBun).
This doesn’t mean that using PocketBun with JS SSR is always a “bad thing” but based on the dozens reported issues so far I would recommend it only after careful evaluation and only to more experienced developers that have in-depth understanding of the used tools and their trade-offs. If you still want to use PocketBun to handle regular users authentication with a JS SSR meta framework, then you can find some JS SDK examples in the repo’s JS SSR integration section.
Why not htmx, Hotwire/Turbo, Unpoly, etc.
htmx, Hotwire/Turbo, Unpoly and other similar tools are commonly used for building server rendered applications but unfortunately they don’t play well with the JSON APIs and fully stateless nature of PocketBun.
It is possible to use them with PocketBun but at the moment I don’t recommend it because we lack the necessary helpers and utilities for building SSR-first applications, which means that you might have to create a lot of things on your own such as middlewares for handling cookies or custom authentication endpoints and access controls (*the collection API rules apply only for the builtin JSON routes). Bun’s native Bun.CSRF.generate(...) / Bun.CSRF.verify(...) helpers can reduce the CSRF part of that work for Bun-native custom endpoints, but PocketBun still doesn’t ship a built-in SSR middleware stack.
In the future we could eventually provide official SSR support in terms of guides and middlewares for this use case but again - PocketBun wasn’t designed with this in mind and you may want to reevaluate the tech stack of your application and switch to a traditional client-side SPA as mentioned earlier or use a different backend solution that might fit better with your use case.
Mobile apps auth persistence
When building mobile apps with the JavaScript SDK you’ll have to specify a custom persistence store if you want to preserve the authentication between the various app activities and open/close state.
The SDK comes with a helper async storage implementation that allows you to hook any custom persistent layer (local file, SharedPreferences, key-value based database, etc.). Here is a minimal PocketBun JS SDK initialization for React Native:
// Node.js and React Native doesn't have native EventSource implementation
                // so in order to use the realtime subscriptions you'll need to load EventSource polyfill,
                // for example: npm install react-native-sse --save
                import eventsource from 'react-native-sse';

                import AsyncStorage from '@react-native-async-storage/async-storage';

                import PocketBase, { AsyncAuthStore } from 'pocketbase';

                // load the polyfill
                global.EventSource = eventsource;

                // initialize the async store
                const store = new AsyncAuthStore({
                    save:    async (serialized) => AsyncStorage.setItem('pb_auth', serialized),
                    initial: AsyncStorage.getItem('pb_auth'),
                });

                // initialize the PocketBase client
                // (it is OK to have a single/global instance for the duration of your application)
                const pb = new PocketBase('http://127.0.0.1:8090', store);

                ...

                await pb.collection('users').authWithPassword('test@example.com', '1234567890');

                console.log(pb.authStore.record)
React Native file upload on Android and iOS
At the time of writing, React Native on Android and iOS seems to have a non-standard FormData implementation and for uploading files on these platforms it requires the following special object syntax:
{
  uri: "...",
  type: "...",
  name: "..."
}
Or in other words, you may have to apply a conditional handling similar to:
const data = new FormData();

// result is the resolved promise of ImagePicker.launchImageLibraryAsync
let imageUri = result.assets[0].uri;

if (Platform.OS === 'web') {
  const req = await fetch(imageUri);
  const blob = await req.blob();
  data.append('avatar', blob); // regular File/Blob value
} else {
  // the below object format works only on Android and iOS
  // (FormData.set() also doesn't seem to be supported so we use FormData.append())
  data.append('avatar', {
    uri:  imageUri,
    type: 'image/*',
    name: imageUri.split('/').pop(),
  });
}

...

await pb.collection('example').create(data)
The next couple pages have a little bit more information about the basic PocketBun components like collections, records, authentication, relations, files handling, etc.
Collections
Overview
Collections represent your application data. Under the hood they are backed by plain SQLite tables that are generated automatically with the collection name and fields (columns).
Single entry of a collection is called record (a single row in the SQL table).
You can manage your collections from the Dashboard, with the Web APIs using the client-side SDKs (superusers only) or programmatically via JavaScript migrations.
Similarly, you can manage your records from the Dashboard, with the Web APIs using the client-side SDKs or programmatically via JavaScript Record operations.
Here is what a collection edit panel looks like in the Dashboard:
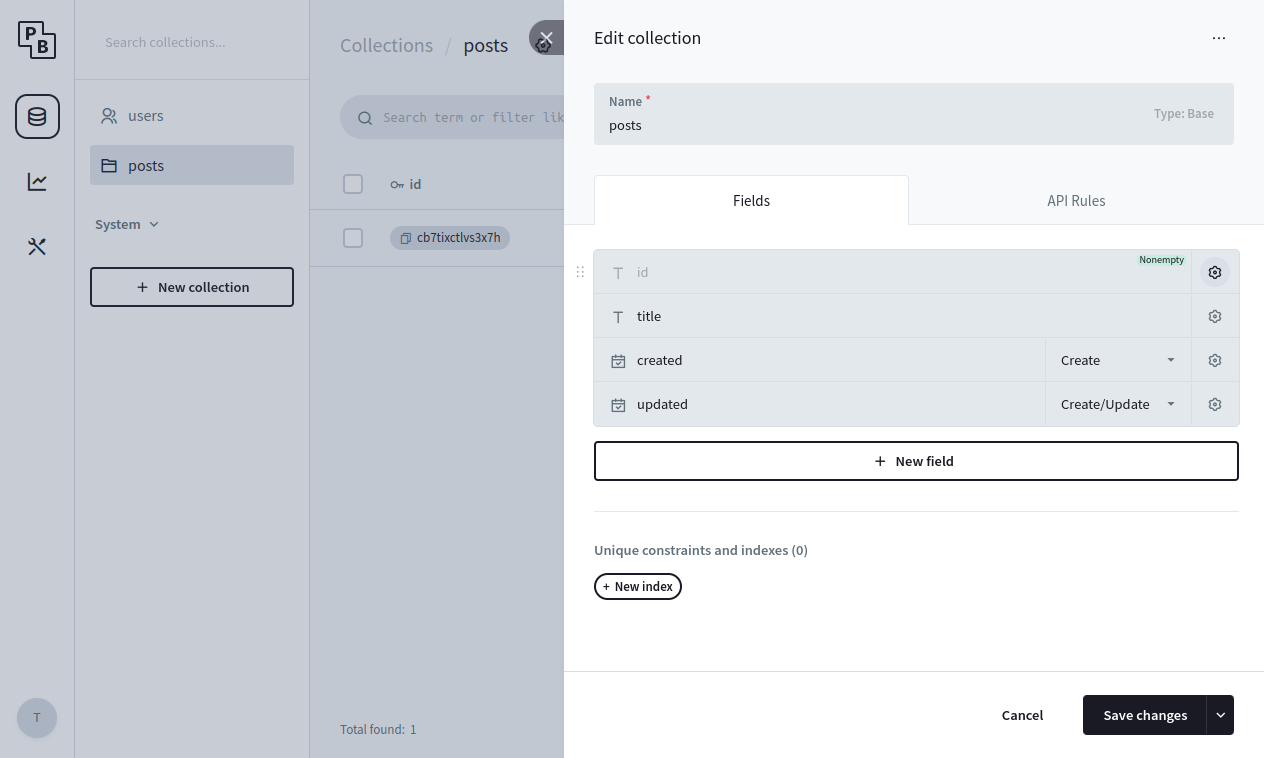
Currently there are 3 collection types: Base, View and Auth.
Base collection
Base collection is the default collection type and it could be used to store any application data (articles, products, posts, etc.).
View collection
View collection is a read-only collection type where the data is populated from a plain SQL SELECT statement, allowing users to perform aggregations or any other custom queries in general. For example, the following query will create a read-only collection with 3 posts fields - id, name and totalComments:
SELECT
    posts.id,
    posts.name,
    count(comments.id) as totalComments
FROM posts
LEFT JOIN comments on comments.postId = posts.id
GROUP BY posts.id
View collections don’t receive realtime events because they don’t have create/update/delete operations.
Auth collection
Auth collection has everything from the Base collection but with some additional special fields to help you manage your app users and also provide various authentication options.
Each Auth collection has the following special system fields: email, emailVisibility, verified, password and tokenKey. They cannot be renamed or deleted but can be configured using their specific field options. For example you can make the user email required or optional.
You can have as many Auth collections as you want (users, managers, staffs, members, clients, etc.) each with their own set of fields, separate login and records managing endpoints.
You can build all sort of different access controls:
- Role (Group)
*
For example, you could attach a “role” select field to your Auth collection with the
following options: “employee” and “staff”. And then in some of your other collections you could
define the following rule to allow only “staff”:
@request.auth.role = "staff"
*
- Relation (Ownership)
*
Let’s say that you have 2 collections - “posts” base collection and “users” auth collection. In
your “posts” collection you can create “author”
relation field pointing to the “users” collection. To allow access to only the
“author” of the record(s), you could use a rule like:
@request.auth.id != "" && author = @request.auth.id
Nested relation fields look ups, including back-relations, are also supported, for example:
someRelField.anotherRelField.author = @request.auth.id
*
- Managed
* In addition to the default “List”, “View”, “Create”, “Update”, “Delete” API rules, Auth collections have also a special “Manage” API rule that could be used to allow one user (it could be even from a different collection) to be able to fully manage the data of another user (e.g. changing their email, password, etc.). *
- Mixed
*
You can build a mixed approach based on your unique use-case. Multiple rules can be grouped with
parenthesis () and combined with &&
(AND) and || (OR) operators:
` @request.auth.id != “” && (@request.auth.role = “staff” || author = @request.auth.id) ` *
Fields
All collection fields (with exception of the JSONField) are non-nullable and use a zero-default for their respective type as fallback value when missing (empty string for text, 0 for number, etc.).
All field specific modifiers are supported both in the Web APIs and via the record Get/Set methods.
BoolField
BoolField defines bool type field to store a single false (default) or true value.
NumberField
NumberField defines number type field for storing numeric/float64 value: 0 (default), 2, -1, 1.5.
The following additional set modifiers are available:
-
fieldName**+**
adds number to the already existing record value.
-
fieldName**-**
subtracts number from the already existing record value.
TextField
TextField defines text type field for storing string values: "" (default), "example".
The following additional set modifiers are available:
-
fieldName**:autogenerate**
autogenerate a field value if the AutogeneratePattern field option is set.
For example, submitting:
`` will result in "abc-[random]"
slug field value.
EmailField
EmailField defines email type field for storing a single email string address: "" (default), "john@example.com".
URLField
URLField defines url type field for storing a single URL string value: "" (default), "https://example.com".
EditorField
EditorField defines editor type field to store HTML formatted text: "" (default), example
.
DateField
DateField defines date type field to store a single datetime string value: "" (default), "2022-01-01 00:00:00.000Z".
All PocketBun dates at the moment follows the RFC3399 format Y-m-d H:i:s.uZ (e.g. 2024-11-10 18:45:27.123Z).
Dates are compared as strings, meaning that when using the filters with a date field you’ll have to specify the full datetime string format. For example to target a single day (e.g. November 19, 2024) you can use something like: ` created >= ‘2024-11-19 00:00:00.000Z’ && created
AutodateField
AutodateField defines an autodate type field and it is similar to the DateField but its value is auto set on record create/update.
This field is usually used for defining timestamp fields like “created” and “updated”.
SelectField
SelectField defines select type field for storing single or multiple string values from a predefined list.
It is usually intended for handling enums-like values such as pending/public/private statuses, simple client/staff/manager/admin roles, etc.
For single select (the MaxSelect option is
= 2) the field value is an array: [], ["optionA", "optionB"].
The following additional set modifiers are available:
-
fieldName**+**
appends one or more values to the existing one.
-
**+**fieldName
prepends one or more values to the existing one.
-
fieldName**-**
subtracts/removes one or more values from the existing one.
For example: ``
FileField
FileField defines file type field for managing record file(s).
PocketBun stores in the database only the file name. The file itself is stored either on the local disk or in S3, depending on your application storage settings.
For single file (the MaxSelect option is
= 2) the stored value is an array: [], ["file1_Ab24ZjL.png", "file2_Frq24ZjL.txt"].
The following additional set modifiers are available:
-
fieldName**+**
appends one or more files to the existing field value.
-
**+**fieldName
prepends one or more files to the existing field value.
-
fieldName**-**
deletes one or more files from the existing field value.
For example: ` `
You can find more detailed information in the Files upload and handling guide.
RelationField
RelationField defines relation type field for storing single or multiple collection record references.
For single relation (the MaxSelect option is
= 2) the field value is an array: [], ["RECORD_ID1", "RECORD_ID2"].
The following additional set modifiers are available:
-
fieldName**+**
appends one or more ids to the existing one.
-
**+**fieldName
prepends one or more ids to the existing one.
-
fieldName**-**
subtracts/removes one or more ids from the existing one.
For example: ``
JSONField
JSONField defines json type field for storing any serialized JSON value, including null (default).
GeoPoint
GeoPoint defines geoPoint type field for storing geographic coordinates (longitude, latitude) as a serialized json object. For example: ``.
The default/zero value of a geoPoint is the “Null Island”, aka. ``.
When extending PocketBun with JavaScript hooks, the geoPoint field value could be set as types.GeoPoint instance or a regular map with lon and lat keys:
record.set("address", {"lon":12.34, "lat":45.67})

                    const address = record.get("address")
API rules and filters
API rules
API Rules are your collection access controls and data filters.
Each collection has 5 rules, corresponding to the specific API action:
-
listRule
-
viewRule
-
createRule
-
updateRule
-
deleteRule
Auth collections have an additional options.manageRule used to allow one user (it could be even from a different collection) to be able to fully manage the data of another user (ex. changing their email, password, etc.).
Each rule could be set to:
-
“locked” - aka. null, which means that the action could be performed
only by an authorized superuser
(this is the default)
- Empty string - anyone will be able to perform the action (superusers, authorized users and guests)
- Non-empty string - only users (authorized or not) that satisfy the rule filter expression will be able to perform this action
PocketBun API Rules act also as records filter! Or in other words, you could for example allow listing only the “active” records of your collection, by using a simple filter expression such as: status = "active" (where “status” is a field defined in your Collection).
Because of the above, the API will return 200 empty items response in case a request doesn’t satisfy a listRule, 400 for unsatisfied createRule and 404 for unsatisfied viewRule, updateRule and deleteRule. All rules will return 403 in case they were “locked” (aka. superuser only) and the request client is not a superuser.
The API Rules are ignored when the action is performed by an authorized superuser (**superusers can access everything)!
Filters syntax
You can find information about the available fields in your collection API rules tab:
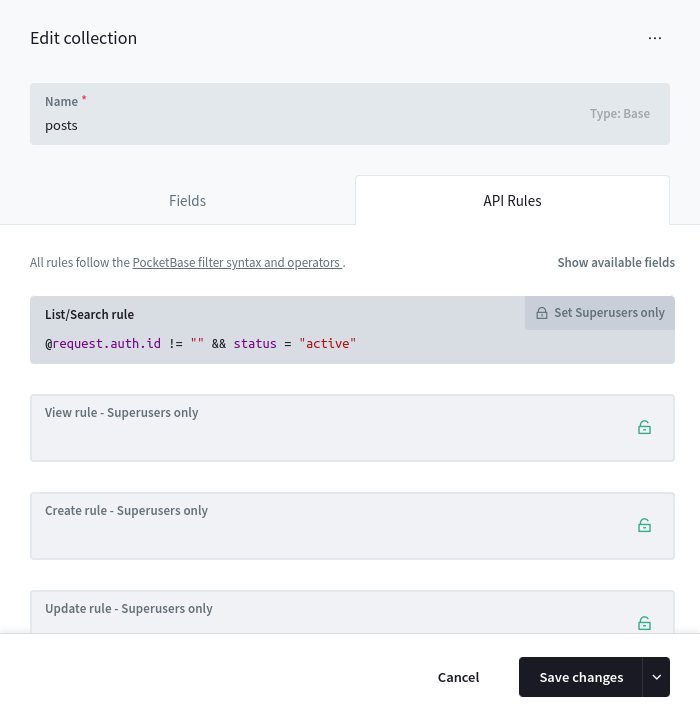
There is autocomplete to help guide you while typing the rule filter expression, but in general you have access to 3 groups of fields:
- Your Collection schema fields
This includes all nested relation fields too, ex.
someRelField.status != "pending"
-
**@request.***
Used to access the current request data, such as query parameters, body/form fields, authorized user state, etc.
-
@request.context - the context where the rule is used (ex.
@request.context != "oauth2")
The currently supported context values are
default,
oauth2,
otp,
password,
realtime,
protectedFile.
-
@request.method - the HTTP request method (ex.
@request.method = "GET")
-
@request.headers.* - the request headers as string values (ex.
@request.headers.x_token = "test")
Note: All header keys are normalized to lowercase and “-“ is replaced with “_” (for example “X-Token” is “x_token”).
-
@request.query.* - the request query parameters as string values (ex.
@request.query.page = "1")
-
@request.auth.* - the current authenticated model (ex.
@request.auth.id != "")
-
@request.body.* - the submitted body parameters (ex.
@request.body.title != "")
Note: Uploaded files are not part of the @request.body
because they are evaluated separately (this behavior may change in the future).
-
**@collection.***
This filter could be used to target other collections that are not directly related to the current one (aka. there is no relation field pointing to it) but both shares a common field value, like for example a category id:
@collection.news.categoryId ?= categoryId && @collection.news.author ?= @request.auth.id
In case you want to join the same collection multiple times but based on different criteria, you can define an alias by appending :alias suffix to the collection name.
// see https://github.com/pocketbase/pocketbase/discussions/3805#discussioncomment-7634791
@request.auth.id != "" &&
@collection.courseRegistrations.user ?= id &&
@collection.courseRegistrations:auth.user ?= @request.auth.id &&
@collection.courseRegistrations.courseGroup ?= @collection.courseRegistrations:auth.courseGroup
Filter syntax reference:
- Format:
OPERAND OPERATOR OPERAND. OPERANDcan be a field literal, string (single or double quoted), number,null,true, orfalse.- Operators:
=equal!=not equal>greater than>=greater than or equal<less than<=less than or equal~like/contains!~not like/contains?=,?!=,?>,?>=,?<,?<=,?~,?!~are any/at-least-one variants- Use
(...),&&, and||to group/combine expressions. - Single line comments are supported:
// comment. - For multi-record fields, operators are match-all by default; prefix the operator with
?for any/at-least-one.
Special identifiers and modifiers
@ macros
The following datetime macros are available and can be used as part of the filter expression:
// all macros are UTC based
// (for more complex date operation check the strftime() function)
@now        - the current datetime as string
@second     - @now second number (0-59)
@minute     - @now minute number (0-59)
@hour       - @now hour number (0-23)
@weekday    - @now weekday number (0-6)
@day        - @now day number
@month      - @now month number
@year       - @now year number
@yesterday  - the yesterday datetime relative to @now as string
@tomorrow   - the tomorrow datetime relative to @now as string
@todayStart - beginning of the current day as datetime string
@todayEnd   - end of the current day as datetime string
@monthStart - beginning of the current month as datetime string
@monthEnd   - end of the current month as datetime string
@yearStart  - beginning of the current year as datetime string
@yearEnd    - end of the current year as datetime string
For example:
@request.body.publicDate >= @now
:isset modifier
The :isset field modifier is available only for the @request.* fields and can be used to check whether the client submitted a specific data with the request. Here is for example a rule that disallows submitting a “role” field:
@request.body.role:isset = false
Note that @request.body.*:isset at the moment doesn’t support checking for new uploaded files because they are evaluated separately and cannot be serialized (*this behavior may change in the future).
:changed modifier
The :changed field modifier is available only for the @request.body.* fields and can be used to check whether the client submitted AND changed a specific record field with the request. Here is for example a rule that disallows changing a “role” field:
// the same as: (@request.body.role:isset = false || @request.body.role = role)
@request.body.role:changed = false
Note that @request.body.*:changed at the moment doesn’t support checking for new uploaded files because they are evaluated separately and cannot be serialized (*this behavior may change in the future).
:length modifier
The :length field modifier could be used to check the number of items in an array field (multiple file, select, relation). Could be used with both the collection schema fields and the @request.body.* fields. For example:
// check example submitted data: {"someSelectField": ["val1", "val2"]}
@request.body.someSelectField:length > 1

// check existing record field length
someRelationField:length = 2
Note that @request.body.*:length at the moment doesn’t support checking for new uploaded files because they are evaluated separately and cannot be serialized (*this behavior may change in the future).
:each modifier
The :each field modifier works only with multiple select, file and relation type fields. It could be used to apply a condition on each item from the field array. For example:
// check if all submitted select options contain the "create" text
@request.body.someSelectField:each ~ "create"

// check if all existing someSelectField has "pb_" prefix
someSelectField:each ~ "pb_%"
Note that @request.body.*:each at the moment doesn’t support checking for new uploaded files because they are evaluated separately and cannot be serialized (*this behavior may change in the future).
:lower modifier
The :lower field modifier could be used to perform lower-case string comparisons. For example:
// check if the submitted lower-cased body "title" field is equal to "test" ("Test", "tEsT", etc.)
@request.body.title:lower = "test"

// match existing records with lower-cased "title" equal to "test" ("Test", "tEsT", etc.)
title:lower ~ "test"
Under the hood it uses the SQLite LOWER scalar function and by default works only for ASCII characters, unless the ICU extension is loaded.
geoDistance(lonA, latA, lonB, latB)
The geoDistance(lonA, latA, lonB, latB) function could be used to calculate the Haversine distance between 2 geographic points in kilometres.
The function is intended to be used primarily with the geoPoint field type, but the accepted arguments could be any plain number or collection field identifier. If the identifier cannot be resolved and converted to a numeric value, it resolves to null. Note that the geoDistance function always results in a single row/record value meaning that “any/at-least-one-of” type of constraint will be applied even if some of its arguments originate from a multiple relation field.
For example:
// offices that are less than 25km from my location (address is a geoPoint field in the offices collection)
geoDistance(address.lon, address.lat, 23.32, 42.69) < 25
strftime(format, [time-value, modifiers…])
The strftime(format, [time-value, modifiers...]) returns a date string formatted according to the specified format argument.
The function is similar to the builtin SQLite strftime with the main difference that NULL results will be normalized for consistency with the non-nullable PocketBun text and date fields.
The function accepts 1, 2 or 3+ arguments.
- The first (format) argument must be a formatting string with valid substitution characters as listed in https://sqlite.org/lang_datefunc.html.
- The second (time-value) argument is optional and must be either a date string, number or collection field identifier with value matching one of the formats listed in https://sqlite.org/lang_datefunc.html#time_values. If not set the function fallbacks to the current datetime.
- The remaining (modifiers) optional arguments are expected to be string literals matching the listed modifiers in
https://sqlite.org/lang_datefunc.html#modifiers (up to 8 max).
A match-all constraint will be also applied in case the time-value is an identifier as a result of a multi-value relation field. For example:
// requires ALL multiRel records to have "created" that match the formatted string "2026-01"
strftime('%Y-%m', multiRel.created) = "2026-01"

// requires ANY/AT-LEAST-ONE-OF multiRel records to have "created" that match the formatted string "2026-01"
strftime('%Y-%m', multiRel.created) ?= "2026-01"
Examples
- Allow only registered users:
@request.auth.id != ""
- Allow only registered users and return records that are either “active” or “pending”:
@request.auth.id != "" && (status = "active" || status = "pending")
- Allow only registered users who are listed in an allowed_users multi-relation field value:
@request.auth.id != "" && allowed_users.id ?= @request.auth.id
- Allow access by anyone and return only the records where the title field value starts with “Lorem” (ex. “Lorem ipsum”):
title ~ "Lorem%"
Authentication
Overview
A single client is considered authenticated as long as it sends valid Authorization:YOUR_AUTH_TOKEN header with the request.
The PocketBun Web APIs are fully stateless and there are no sessions in the traditional sense (even the tokens are not stored in the database).
Because there are no sessions and we don’t store the tokens on the server there is also no logout endpoint. To “logout” a user you can simply disregard the token from your local state (aka. pb.authStore.clear() if you use the SDKs).
The auth token could be generated either through the specific auth collection Web APIs or programmatically via JavaScript hooks.
All allowed auth collection methods can be configured individually from the specific auth collection options.
Note that PocketBun admins (aka. _superusers) are similar to the regular auth collection records with 2 caveats:
-
OAuth2 is not supported as auth method for the
_superuserscollection -
Superusers can access and modify anything (collection API rules are ignored)
Authenticate with password
To authenticate with password you must enable the Identity/Password auth collection option * (see also Web API reference ) *.
The default identity field is the email but you can configure any other unique field like “username” (it must have a UNIQUE index).
import PocketBase from 'pocketbase';

        const pb = new PocketBase('http://127.0.0.1:8090');

        ...

        const authData = await pb.collection("users").authWithPassword('test@example.com', '1234567890');

        // after the above you can also access the auth data from the authStore
        console.log(pb.authStore.isValid);
        console.log(pb.authStore.token);
        console.log(pb.authStore.record.id);

        // "logout" the last authenticated record
        pb.authStore.clear();
Authenticate with OTP
To authenticate with email code you must enable the One-time password (OTP) auth collection option * (see also Web API reference ) *.
The usual flow is the user typing manually the received password from their email but you can also adjust the default email template from the collection options and add a url containing the OTP and its id as query parameters * (you have access to and placeholders) *.
Note that when requesting an OTP we return an otpId even if a user with the provided email doesn’t exist as a very rudimentary enumeration protection (it doesn’t create or send anything).
On successful OTP validation, by default the related user email will be automatically marked as “verified”.
Keep in mind that OTP as a standalone authentication method could be less secure compared to the other methods because the generated password is usually 0-9 digits and there is a risk of it being guessed or enumerated (especially when a longer duration time is configured).
For security critical applications OTP is recommended to be used in combination with the other auth methods and the Multi-factor authentication option.
import PocketBase from 'pocketbase';

        const pb = new PocketBase('http://127.0.0.1:8090');

        ...

        // send OTP email to the provided auth record
        const result = await pb.collection('users').requestOTP('test@example.com');

        // ... show a screen/popup to enter the password from the email ...

        // authenticate with the requested OTP id and the email password
        const authData = await pb.collection('users').authWithOTP(result.otpId, "YOUR_OTP");

        // after the above you can also access the auth data from the authStore
        console.log(pb.authStore.isValid);
        console.log(pb.authStore.token);
        console.log(pb.authStore.record.id);

        // "logout"
        pb.authStore.clear();
Authenticate with OAuth2
You can also authenticate your users with an OAuth2 provider (Google, GitHub, Microsoft, etc.). See the section below for example integrations.
Multi-factor authentication
PocketBun v0.23+ introduced optional Multi-factor authentication (MFA).
If enabled, it requires the user to authenticate with any 2 different auth methods from above (the order doesn’t matter). The expected flow is:
- User authenticates with “Auth method A”.
-
On success, a 401 response is sent with `` as JSON body (the MFA
“session” is stored in the _mfas system collection).
-
User authenticates with “Auth method B” as usual
**but adds the mfaId from the previous step as body or query parameter
.
- On success, a regular auth response is returned, aka. token + auth record data.
Below is an example for email/password + OTP authentication:
import PocketBase from 'pocketbase';

        const pb = new PocketBase('http://127.0.0.1:8090');

        ...

        try {
          await pb.collection('users').authWithPassword('test@example.com', '1234567890');
        } catch (err) {
          const mfaId = err.response?.mfaId;
          if (!mfaId) {
            throw err; // not mfa -> rethrow
          }

          // the user needs to authenticate again with another auth method, for example OTP
          const result = await pb.collection('users').requestOTP('test@example.com');
          // ... show a modal for users to check their email and to enter the received code ...
          await pb.collection('users').authWithOTP(result.otpId, 'EMAIL_CODE', { 'mfaId': mfaId });
        }
Users impersonation
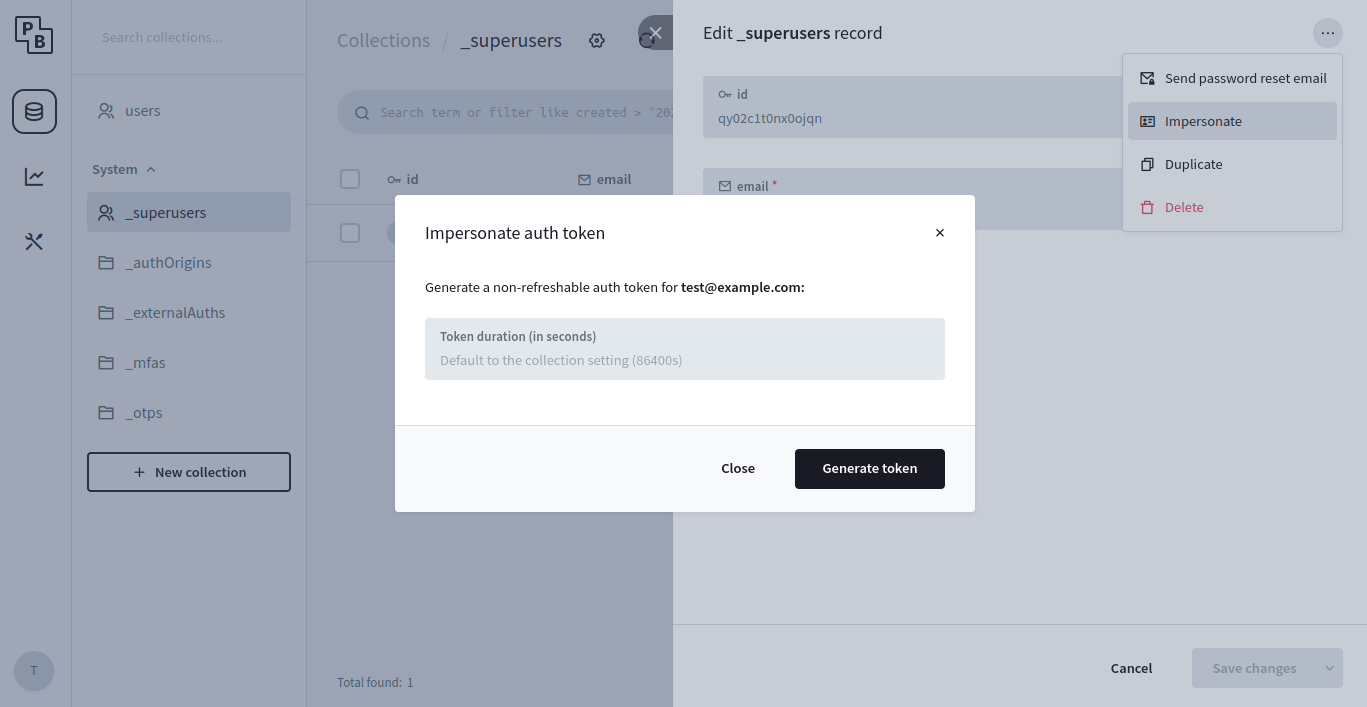
Superusers have the option to generate tokens and authenticate as anyone else via the Impersonate endpoint .
** The generated impersonate auth tokens can have custom duration but are not renewable! **
For convenience the official SDKs creates and returns a standalone client that keeps the token state in memory, aka. only for the duration of the impersonate client instance.
import PocketBase from 'pocketbase';

        const pb = new PocketBase('http://127.0.0.1:8090');

        ...

        // authenticate as superuser
        await pb.collection("_superusers").authWithPassword("test@example.com", "1234567890");

        // impersonate
        // (the custom token duration is in seconds and it is optional)
        const impersonateClient = await pb.collection("users").impersonate("USER_RECORD_ID", 3600)

        // log the impersonate token and user data
        console.log(impersonateClient.authStore.token);
        console.log(impersonateClient.authStore.record);

        // send requests as the impersonated user
        const items = await impersonateClient.collection("example").getFullList();
API keys
While PocketBun doesn’t have “API keys” in the traditional sense, as a side effect of the support for users impersonation, for such cases you can use instead the generated nonrenewable _superusers impersonate auth token. You can generate such token via the above impersonate API or from the *Dashboard > Collections > _superusers > > “Impersonate” dropdown option:
Because of the security implications (superusers can execute, access and modify anything), use the generated _superusers tokens with extreme care and only for internal server-to-server communication.
To invalidate already issued tokens, you need to change the individual superuser account password (or if you want to reset the tokens for all superusers - change the shared auth token secret from the _superusers collection options).
Auth token verification
PocketBun doesn’t have a dedicated token verification endpoint, but if you want to verify an existing auth token from a 3rd party app you can send an Auth refresh call, aka. pb.collection("users").authRefresh().
On valid token - it returns a new token with refreshed exp claim and the latest user data.
Otherwise - returns an error response.
Note that calling authRefresh doesn’t invalidate previously issued tokens and you can safely disregard the new one if you don’t need it (as mentioned in the beginning - PocketBun doesn’t store the tokens on the server).
Performance wise, the used HS256 algorithm for generating the JWT has very little to no impact and it is essentially the same in terms of response time as calling getOne("USER_ID") * (see benchmarks) *.
Before starting, you’ll need to create an OAuth2 app in the provider’s dashboard in order to get a Client Id and Client Secret, and register a redirect URL .
Once you have obtained the Client Id and Client Secret, you can enable and configure the provider from your PocketBun auth collection options (*PocketBun > Collections > > Edit collection (settings cogwheel) > Options > OAuth2).
All in one (recommended)
Manual code exchange
This method handles everything within a single call without having to define custom redirects, deeplinks or even page reload.
** When creating your OAuth2 app, for a callback/redirect URL you have to use the https://yourdomain.com/api/oauth2-redirect ** (* or when testing locally - http://127.0.0.1:8090/api/oauth2-redirect *).
import PocketBase from 'pocketbase';

                    const pb = new PocketBase('https://pocketbase.io');

                    ...

                    // This method initializes a one-off realtime subscription and will
                    // open a popup window with the OAuth2 vendor page to authenticate.
                    //
                    // Once the external OAuth2 sign-in/sign-up flow is completed, the popup
                    // window will be automatically closed and the OAuth2 data sent back
                    // to the user through the previously established realtime connection.
                    //
                    // If the popup is being blocked on Safari, make sure that your click handler is not using async/await.
                    pb.collection('users').authWithOAuth2({
                        provider: 'google'
                    }).then((authData) => {
                        console.log(authData)

                        // after the above you can also access the auth data from the authStore
                        console.log(pb.authStore.isValid);
                        console.log(pb.authStore.token);
                        console.log(pb.authStore.record.id);

                        // "logout" the last authenticated record
                        pb.authStore.clear();
                    });
When authenticating manually with OAuth2 code you’ll need 2 endpoints:
- somewhere to show the “Login with …” links
- somewhere to handle the provider’s redirect in order to exchange the auth code for token
Here is a simple web example:
-
Links page (e.g. https://127.0.0.1:8090 serving pb_public/index.html):
-
Redirect handler page (e.g. https://127.0.0.1:8090/redirect.html serving pb_public/redirect.html):
When using the “Manual code exchange” flow for sign-in with Apple your redirect handler must accept POST requests in order to receive the name and the email of the Apple user. If you just need the Apple user id, you can keep the redirect handler GET but you’ll need to replace in the Apple authorization url response_mode=form_post with response_mode=query.
Files upload and handling
Uploading files
To upload files, you must first add a file field to your collection:
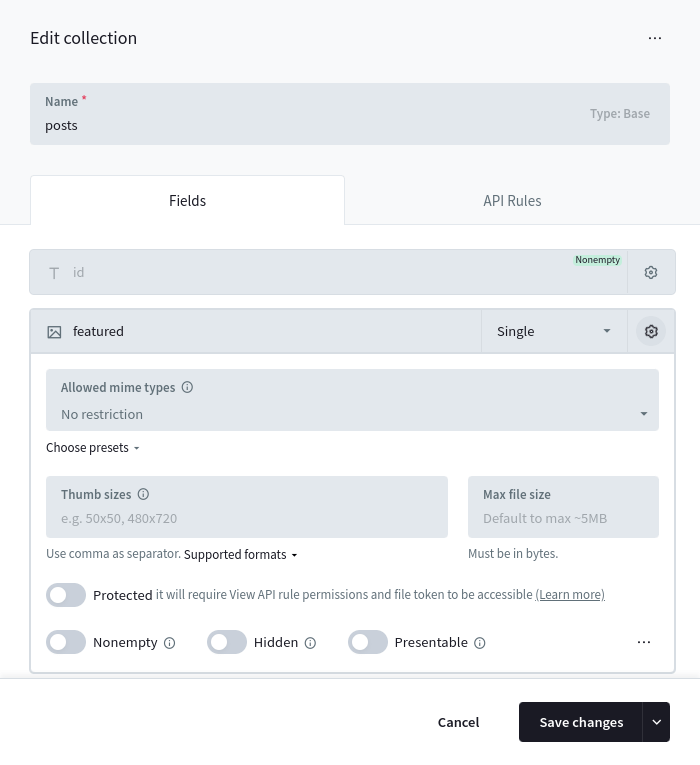
Once added, you could create/update a Record and upload “documents” files by sending a multipart/form-data request using the Records create/update APIs.
Each uploaded file will be stored with the original filename (sanitized) and suffixed with a random part (usually 10 characters). For example test_52iwbgds7l.png.
All file fields by default has a max allowed file size up to ~5MB *(you can adjust it from the collection field options but keep in mind that allowing to upload and serve large files could degrade the performance of your application).
Here is an example how to create a new record and upload multiple files to the example “documents” file field using the SDKs:
// ———————————————————–
const fileInput = document.getElementById(‘fileInput’);
const formData = new FormData();
// set regular text field formData.append(‘title’, ‘Hello world!’);
// listen to file input changes and add the selected files to the form data fileInput.addEventListener(‘change’, function () });
…
// upload and create new record
const createdRecord = await pb.collection(‘example’).create(formData);
}
If your
file field supports uploading multiple files (aka. **Max Files option is >= 2**) you can use the +` prefix/suffix field name modifier to respectively prepend/append new files alongside the already uploaded ones. For example:
import PocketBase from 'pocketbase';

        const pb = new PocketBase('http://127.0.0.1:8090');

        ...

        const createdRecord = await pb.collection('example').update('RECORD_ID', {
            "documents+": new File(["content 3..."], "file3.txt")
        });
Deleting files
To delete uploaded file(s), you could either edit the Record from the Dashboard, or use the API and set the file field to a zero-value (empty string, []).
If you want to delete individual file(s) from a multiple file upload field, you could suffix the field name with - and specify the filename(s) you want to delete. Here are some examples using the SDKs:
import PocketBase from 'pocketbase';

        const pb = new PocketBase('http://127.0.0.1:8090');

        ...

        // delete all "documents" files
        await pb.collection('example').update('RECORD_ID', {
            'documents': [],
        });

        // delete individual files
        await pb.collection('example').update('RECORD_ID', {
            'documents-': ["file1.pdf", "file2.txt"],
        });
The above examples use the JSON object data format, but you could also use FormData instance for multipart/form-data requests. If using FormData set the file field to an empty string.
File URL
Each uploaded file could be accessed by requesting its file url: ` http://127.0.0.1:8090/api/files/COLLECTION_ID_OR_NAME/RECORD_ID/FILENAME `
If your file field has the Thumb sizes option, you can get a thumb of the image file by adding the thumb query parameter to the url like this: ` http://127.0.0.1:8090/api/files/COLLECTION_ID_OR_NAME/RECORD_ID/FILENAME?thumb=100x300 ` Currently limited to jpg, png, gif (its first frame) and webp.
Supported thumb formats:
WxH(e.g.100x300) crop toWxHfrom centerWxHt(e.g.100x300t) crop toWxHfrom topWxHb(e.g.100x300b) crop toWxHfrom bottomWxHf(e.g.100x300f) fit insideWxHwithout cropping0xH(e.g.0x300) resize to height while preserving aspect ratioWx0(e.g.100x0) resize to width while preserving aspect ratio
The original file would be returned, if the requested thumb size is not found or the file is not an image!
PocketBun uses Bun’s built-in Bun.Image for thumbnail generation. Binary output may differ from upstream, newly generated thumbnails are intentionally stored as WebP (Content-Type: image/webp) for every supported source image format, and crop-style thumb variants follow Bun.Image exact-size resize behavior instead of PocketBase’s crop positioning.
If you already have a Record model instance, the SDKs provide a convenient method to generate a file url by its name.
import PocketBase from 'pocketbase';

        const pb = new PocketBase('http://127.0.0.1:8090');

        ...

        const record = await pb.collection('example').getOne('RECORD_ID');

        // get only the first filename from "documents"
        //
        // note:
        // "documents" is an array of filenames because
        // the "documents" field was created with "Max Files" option > 1;
        // if "Max Files" was 1, then the result property would be just a string
        const firstFilename = record.documents[0];

        // returns something like:
        // http://127.0.0.1:8090/api/files/example/kfzjt5oy8r34hvn/test_52iWbGinWd.png?thumb=100x250
        const url = pb.files.getURL(record, firstFilename, {'thumb': '100x250'});
Additionally, to instruct the browser to always download the file instead of showing a preview when accessed directly, you can append the ?download=1 query parameter to the file url.
Protected files
By default all files are publicly accessible if you know their full url.
For most applications this is fine and reasonably safe because all files have a random part appended to their name, but in some cases you may want an extra security to prevent unauthorized access to sensitive files like ID card or Passport copies, contracts, etc.
To do this you can mark the file field as Protected from its field options in the Dashboard and then request the file with a special short-lived file token.
Only requests that satisfy the View API rule of the record collection will be able to access or download the protected file(s).
The file token is used to populate the @request.auth.* filter fields and it could be optional depending on your View API rule. For example, if a View API rule is an empty string then anyone will have access to the file even when there is no file token.
import PocketBase from 'pocketbase';

        const pb = new PocketBase('http://127.0.0.1:8090');

        ...

        // authenticate
        await pb.collection('users').authWithPassword('test@example.com', '1234567890');

        // generate a file token
        const fileToken = await pb.files.getToken();

        // retrieve an example protected file url (will be valid ~2min)
        const record = await pb.collection('example').getOne('RECORD_ID');
        const url = pb.files.getURL(record, record.myPrivateFile, {'token': fileToken});
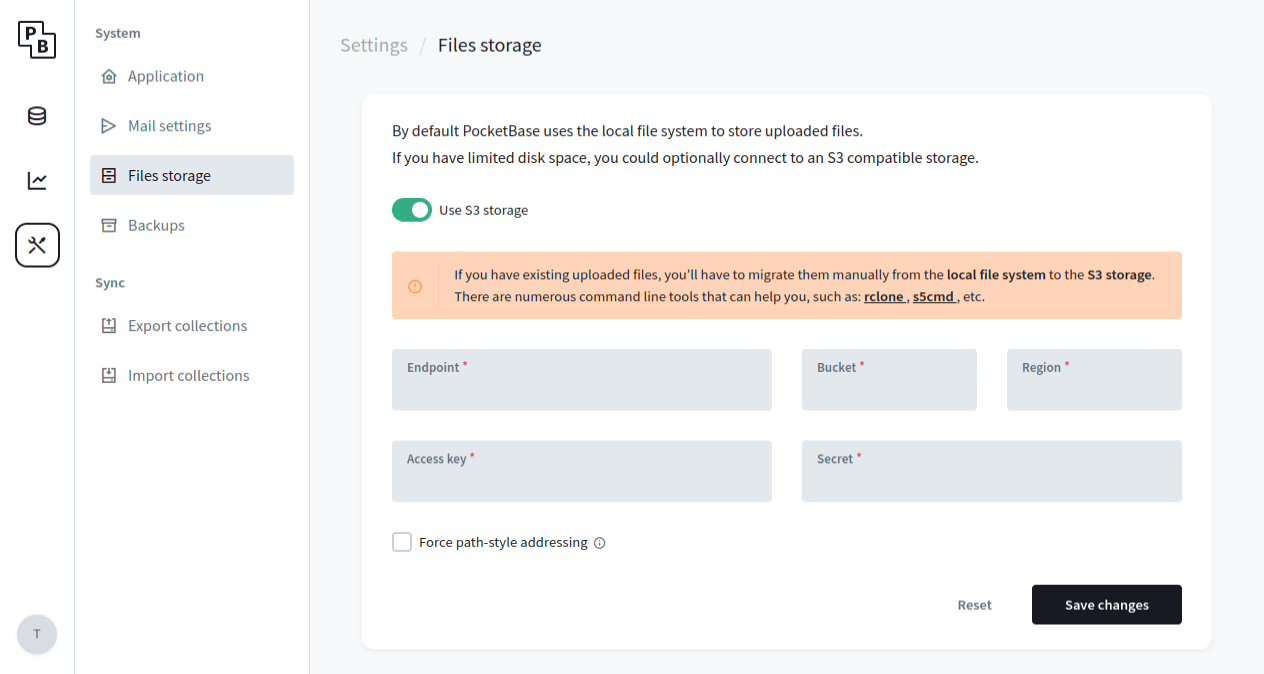
Storage options
By default PocketBun stores uploaded files in the pb_data/storage directory on the local file system. For the majority of cases this is usually the recommended storage option because it is very fast, easy to work with and backup.
But if you have limited disk space you could switch to an external S3 compatible storage (AWS S3, MinIO, Wasabi, DigitalOcean Spaces, Vultr Object Storage, etc.). The easiest way to set up the connection settings is from the Dashboard > Settings > Files storage:
Working with relations
Overview
Let’s assume that we have the following collections structure:

The relation fields follow the same rules as any other collection field and can be set/modified by directly updating the field value - with a record id or array of ids, in case a multiple relation is used.
Below is an example that shows creating a new posts record with 2 assigned tags.
import PocketBase from 'pocketbase';

        const pb = new PocketBase('http://127.0.0.1:8090');

        ...

        const post = await pb.collection('posts').create({
            'title': 'Lorem ipsum...',
            'tags':  ['TAG_ID1', 'TAG_ID2'],
        });
Prepend/Append to multiple relation
To prepend/append a single or multiple relation id(s) to an existing value you can use the + field modifier:
import PocketBase from 'pocketbase';

        const pb = new PocketBase('http://127.0.0.1:8090');

        ...

        const post = await pb.collection('posts').update('POST_ID', {
            // prepend single tag
            '+tags': 'TAG_ID1',

            // append multiple tags at once
            'tags+': ['TAG_ID1', 'TAG_ID2'],
        })
Remove from multiple relation
To remove a single or multiple relation id(s) from an existing value you can use the - field modifier:
import PocketBase from 'pocketbase';

        const pb = new PocketBase('http://127.0.0.1:8090');

        ...

        const post = await pb.collection('posts').update('POST_ID', {
            // remove single tag
            'tags-': 'TAG_ID1',

            // remove multiple tags at once
            'tags-': ['TAG_ID1', 'TAG_ID2'],
        })
Expanding relations
You can also expand record relation fields directly in the returned response without making additional requests by using the expand query parameter, e.g. ?expand=user,post.tags
Only the relations that the request client can View (aka. satisfies the relation collection’s View API Rule) will be expanded.
Nested relation references in expand, filter or sort are supported via dot-notation and up to 6-levels depth.
For example, to list all comments with their user relation expanded, we can do the following:
await pb.collection("comments").getList(1, 30, { expand: "user" })
{
    "page": 1,
    "perPage": 30,
    "totalPages": 1,
    "totalItems": 20,
    "items": [
        {
            "id": "lmPJt4Z9CkLW36z",
            "collectionId": "BHKW36mJl3ZPt6z",
            "collectionName": "comments",
            "created": "2022-01-01 01:00:00.456Z",
            "updated": "2022-01-01 02:15:00.456Z",
            "post": "WyAw4bDrvws6gGl",
            "user": "FtHAW9feB5rze7D",
            "message": "Example message...",
            "expand": {
                "user": {
                    "id": "FtHAW9feB5rze7D",
                    "collectionId": "srmAo0hLxEqYF7F",
                    "collectionName": "users",
                    "created": "2022-01-01 00:00:00.000Z",
                    "updated": "2022-01-01 00:00:00.000Z",
                    "username": "users54126",
                    "verified": false,
                    "emailVisibility": false,
                    "name": "John Doe"
                }
            }
        },
        ...
    ]
}
Back-relations
PocketBun supports also filter, sort and expand for back-relations - relations where the associated relation field is not in the main collection.
The following notation is used: referenceCollection**_via_**relField (ex. comments_via_post).
For example, let’s list the posts that have at least one comments record containing the word “hello”:
await pb.collection("posts").getList(1, 30, {
            filter: "comments_via_post.message ?~ 'hello'"
            expand: "comments_via_post.user",
        })
{
    "page": 1,
    "perPage": 30,
    "totalPages": 2,
    "totalItems": 45,
    "items": [
        {
            "id": "WyAw4bDrvws6gGl",
            "collectionId": "1rAwHJatkTNCUIN",
            "collectionName": "posts",
            "created": "2022-01-01 01:00:00.456Z",
            "updated": "2022-01-01 02:15:00.456Z",
            "title": "Lorem ipsum dolor sit...",
            "expand": {
                "comments_via_post": [
                    {
                        "id": "lmPJt4Z9CkLW36z",
                        "collectionId": "BHKW36mJl3ZPt6z",
                        "collectionName": "comments",
                        "created": "2022-01-01 01:00:00.456Z",
                        "updated": "2022-01-01 02:15:00.456Z",
                        "post": "WyAw4bDrvws6gGl",
                        "user": "FtHAW9feB5rze7D",
                        "message": "lorem ipsum...",
                        "expand": {
                            "user": {
                                "id": "FtHAW9feB5rze7D",
                                "collectionId": "srmAo0hLxEqYF7F",
                                "collectionName": "users",
                                "created": "2022-01-01 00:00:00.000Z",
                                "updated": "2022-01-01 00:00:00.000Z",
                                "username": "users54126",
                                "verified": false,
                                "emailVisibility": false,
                                "name": "John Doe"
                            }
                        }
                    },
                    {
                        "id": "tu4Z9CkLW36mPJz",
                        "collectionId": "BHKW36mJl3ZPt6z",
                        "collectionName": "comments",
                        "created": "2022-01-01 01:10:00.123Z",
                        "updated": "2022-01-01 02:39:00.456Z",
                        "post": "WyAw4bDrvws6gGl",
                        "user": "FtHAW9feB5rze7D",
                        "message": "hello...",
                        "expand": {
                            "user": {
                                "id": "FtHAW9feB5rze7D",
                                "collectionId": "srmAo0hLxEqYF7F",
                                "collectionName": "users",
                                "created": "2022-01-01 00:00:00.000Z",
                                "updated": "2022-01-01 00:00:00.000Z",
                                "username": "users54126",
                                "verified": false,
                                "emailVisibility": false,
                                "name": "John Doe"
                            }
                        }
                    },
                    ...
                ]
            }
        },
        ...
    ]
}
Back-relation caveats
- By default the back-relation reference is resolved as a dynamic multiple relation field, even when the back-relation field itself is marked as single.
This is because the main record could have more than one single
back-relation reference (see in the above example that the comments_via_post
expand is returned as array, although the original comments.post field is a
single relation).
The only case where the back-relation will be treated as a single
relation field is when there is
UNIQUE index constraint defined on the relation field.
-
Back-relation expand is limited to max 1000 records per relation field. If you
need to fetch larger number of back-related records a better approach could be to send a
separate paginated getList() request to the back-related collection to avoid transferring
large JSON payloads and to reduce the memory usage.
Extending PocketBun
One of the main features of PocketBun is that it can be used as a framework which enables you to write your own custom app business logic in JavaScript.
** Choose Extend with JavaScript if you want to build custom server logic directly in your PocketBun project. **
With JavaScript, you can:
- Register custom routes:
routerAdd("GET", "/hello", (e) => {
                    return e.string(200, "Hello world!")
                })
- Bind to event hooks and intercept responses:
onRecordCreateRequest((e) => {
                    // if not superuser, overwrite the newly submitted "posts" record status to pending
                    if (!e.hasSuperuserAuth()) {
                        e.record.set("status", "pending")
                    }

                    e.next()
                }, "posts")
- Register custom console commands:
$app.rootCmd.addCommand(new Command({
                    use: "hello",
                    run: (cmd, args) => {
                        console.log("Hello world!")
                    },
                }))
- and many more…
For further info, please check the Extend PocketBun guide.
Attribution
This page is adapted from PocketBase docs.